【GoogleHomeでメモ帳アプリを作る】1. Herokuのチュートリアルをする
概要
PAASサーバを提供しているherokuを使ってみる
資料全体の構成はここに記載: GoogleHomeに話しかけてメモを記録したりメモを読み上げてもらう
チュートリアル
https://devcenter.heroku.com/star からpythonを選ぶ
supported-python-runtimes
https://devcenter.heroku.com/articles/python-support#supported-python-runtimes
Supportしているpythonバージョンは以下
python-3.6.3
python-2.7.14
herokuを使うための前提条件を満たす
https://devcenter.heroku.com/articles/getting-started-with-python#introduction
a free Heroku account.
Python version 3.6 installed locally - see the installation guides for OS X, Windows, and Linux.
Pipenv installed locally. Accomplish this by running pip install pipenv.
Postgres installed locally, if running the app locally
python3.6を入れる
$ pyenv install 3.6.3

$ pyenv local 3.6.3
$ pyenv versions
  system
  3.5.4
* 3.6.3 (set by /home/ludwig125/.python-version)
$
pipenvを入れる
- pipenvとは
http://pipenv-ja.readthedocs.io/ja/translate-ja/basics.html http://pipenv-ja.readthedocs.io/ja/translate-ja/
Pipenvは、手動でパッケージのインストールおよびアンインストールを行うのと同じように Pipfile に対してパッケージの追加および削除を行うのに加え、自動でプロジェクト用の仮想環境を作成し管理します。
Pipenvの特徴 http://pipenv-ja.readthedocs.io/ja/translate-ja/#pipenv-features
何をしたいか を簡単に指定するだけで、真の 決定論的ビルド が可能です。
固定された依存関係のファイルハッシュを生成しチェックします。
pyenv が使える場合は、要求されているPythonを自動でインストールします。
Pipfile を探して、再帰的に、プロジェクトホームを自動で見付けに行きます。
Pipfile が存在していない場合、自動で生成します。
標準的な場所に仮想環境を自動で作成します。
パッケージがインストールもしくはアンインストールされたときに、自動で Pipfile に追加および削除します。
.env ファイルが存在する場合、自動で読み込みます。
$ pip install pipenv
Postgresを入れる
- Postgresとは
https://ja.wikipedia.org/wiki/PostgreSQL
https://devcenter.heroku.com/articles/heroku-postgresql#local-setup
$ export DATABASE_URL=postgres://$(whoami)
$ sudo apt-get install postgresql
$ which psql
/usr/bin/psql
$ psql
psql: FATAL:  role "ludwig125" does not exist
$
https://qiita.com/ibara1454/items/40ce2d82926f48cf02bc を参考に以下を実施
[~] $ /etc/init.d/postgresql start
chmod: `/var/run/postgresql' のパーミッションを変更しています: 許可されていない操作です
 * Starting PostgreSQL 9.3 database server
 * Error: You must run this program as the cluster owner (postgres) or root
   ...fail!
[~] $ sudo /etc/init.d/postgresql start
 * Starting PostgreSQL 9.3 database server
   ...done.
[~] $  /etc/init.d/postgresql status
9.3/main (port 5432): online
[~] $ psql
psql: FATAL:  role "ludwig125" does not exist
[~] $
 $ less /etc/passwd を見ると
postgres:x:119:128:PostgreSQL administrator
がある
$ sudo su - postgres
postgres@ludwig125-virtual-machine:~$
postgres@ludwig125-virtual-machine:~$ psql
psql (9.3.20)
Type "help" for help.

postgres=#


postgres=# \du
                             List of roles
 Role name |                   Attributes                   | Member of
-----------+------------------------------------------------+-----------
 postgres  | Superuser, Create role, Create DB, Replication | {}

postgres=#
デフォルトでは他のロールが存在しないので、ロールはスーパユーザのpostgresだけ
postgres=# SELECT rolname FROM pg_roles;
 rolname
----------
 postgres
(1 row)

postgres=#
とりあえず前提に書いてあることをしたのでこのあとからセットアップしていく
Heroku Set up
https://devcenter.heroku.com/articles/getting-started-with-python#set-up
https://devcenter.heroku.com/articles/heroku-cli#debian-ubuntu wgetでのとり方がここに書いてあった
$ wget -qO- https://cli-assets.heroku.com/install-ubuntu.sh | sh
CLIを使ってみる
$ heroku login
Enter your Heroku credentials:
Email: <アカウントを作ったときのEmail>
Password: <同上、パスワード>
Logged in as <mail>
[~] $
prepare-the-app
https://devcenter.heroku.com/articles/getting-started-with-python#prepare-the-app
アプリ作成の準備
$ git clone https://github.com/heroku/python-getting-started.git
$ cd python-getting-started
Deploy the app
https://devcenter.heroku.com/articles/getting-started-with-python#deploy-the-app
herokuのアプリの作成
- 特に指定しなければ適当なアプリ名が割り振られる こんな感じ
[~/git/ludwig125/python-getting-started] $ heroku create
Creating app... done, ⬢ powerful-chamber-29168
https://powerful-chamber-29168.herokuapp.com/ | https://git.heroku.com/powerful-chamber-29168.git
[~/git/python-getting-started] $
herokuにこのアプリをデプロイするには以下のようにgitコマンドを実施する
[~/git/ludwig125/python-getting-started] $ git push heroku master
Counting objects: 385, done.
Compressing objects: 100% (177/177), done.
Writing objects: 100% (385/385), 68.53 KiB | 0 bytes/s, done.
Total 385 (delta 184), reused 385 (delta 184)
remote: Compressing source files... done.
remote: Building source:
remote:
remote: -----> Python app detected
remote: -----> Installing python-3.6.3
remote: -----> Installing pip
remote: -----> Installing requirements with latest Pipenv…
remote:        Installing dependencies from Pipfile.lock (2899d6)…
remote: -----> $ python manage.py collectstatic --noinput
remote:        119 static files copied to '/tmp/build_ac2a9e4e970eca0b6aae1bfdd898a194/staticfiles', 145 post-processed.
remote:
remote: -----> Discovering process types
remote:        Procfile declares types -> web
remote:
remote: -----> Compressing...
remote:        Done: 60.5M
remote: -----> Launching...
remote:        Released v4
remote:        https://powerful-chamber-29168.herokuapp.com/ deployed to Heroku
remote:
remote: Verifying deploy... done.
To https://git.heroku.com/powerful-chamber-29168.git
 * [new branch]      master -> master
[~/git/ludwig125/python-getting-started] $
これでアプリがデプロイされたはずなので、アプリのインスタンスが動いていることを確認
[~/git/ludwig125/python-getting-started] $ heroku ps:scale web=1
Scaling dynos... done, now running web at 1:Free
[~/git/ludwig125/python-getting-started] $
この時点でhttps://powerful-chamber-29168.herokuapp.com/ にアクセスすると「Heroku | Welcome to your new app!」が出た

アプリのWebサイトを立ち上げるには以下のコマンドを実施する 以下でWebページ(https://powerful-chamber-29168.herokuapp.com/) に飛ぶ
[~/git/python-getting-started] $ heroku open
[~/git/python-getting-started] $
Define a Procfile
https://devcenter.heroku.com/articles/getting-started-with-python#define-a-procfile
Profileとは
- アプリのスタート時に動くファイルを定義するもの
[~/git/ludwig125/python-getting-started] $ cat Procfile
web: gunicorn gettingstarted.wsgi
[~/git/ludwig125/python-getting-started] $
Scale the app
https://devcenter.heroku.com/articles/getting-started-with-python#scale-the-app
herokuのアプリは「Dyno」の単位で動いている
Dynoって? - https://devcenter.heroku.com/articles/dynos
以下でDynoのプロセスがどういう状態か確認できる
[~/git/ludwig125/python-getting-started] $ heroku ps
Free dyno hours quota remaining this month: 547h 29m (99%)
For more information on dyno sleeping and how to upgrade, see:
https://devcenter.heroku.com/articles/dyno-sleeping

=== web (Free): gunicorn gettingstarted.wsgi (1)
web.1: idle 2017/12/22 02:08:22 +0900 (~ 20h ago)

[~/git/ludwig125/python-getting-started] $
Declare app dependencies
https://devcenter.heroku.com/articles/getting-started-with-python#declare-app-dependencies
Heroku recognizes an app as a Python app by the existence of a Pipfile or requirements.txt file in the root directory.
herokuでは、Pipfileかrequirements.txtがherokuのルートディレクトリにあると、Pythonアプリだと認識してくれるらしい
The Pipfile file lists the app dependencies together with their versions.
Pipfileはアプリの依存関係を記載する これは後述のpipenvで必要なファイルとなっている
チュートリアルのファイルを見てみるとこんな感じ
[~/git/ludwig125/python-getting-started] $ cat Pipfile
[[source]]

url = "https://pypi.python.org/simple"
verify_ssl = true


[packages]

django = "*"
gunicorn = "*"
django-heroku = "*"


[requires]

python_version = "3.6"
[~/git/ludwig125/python-getting-started] $
requirements.txtをつくっておく
[~/git/ludwig125/python-getting-started] $ pip3 freeze > requirements.txt
[~/git/ludwig125/python-getting-started] $ cat requirements.txt
certifi==2017.11.5
chardet==3.0.4
Django==2.0
flake8==3.5.0
idna==2.6
mccabe==0.6.1
pew==1.1.2
pipenv==9.0.1
pycodestyle==2.3.1
pyflakes==1.6.0
pytz==2017.3
requests==2.18.4
urllib3==1.22
virtualenv==15.1.0
virtualenv-clone==0.2.6
[~/git/ludwig125/python-getting-started] $
herokuはデプロイ時にこれらのファイルを以下のコマンドを実行することで読み込み必要な環境を作成している
pipenv install --system --skip-lock
herokuのデプロイ上の環境をローカルの開発環境で再現するために、以下pipenvの設定をする
Python 3の仮想環境を初期化するには、 $ pipenv --three を実行する
https://github.com/pypa/pipenv/issues/729 https://github.com/pypa/pipenv/issues/700 を参考に作り直す
pipenv --python 3.6.3と指定してinstallする
[~/git/ludwig125/python-getting-started] $ pipenv --rm
Removing virtualenv (/home/ludwig125/.local/share/virtualenvs/python-getting-started-1TrsocCI)…
[~/git/ludwig125/python-getting-started] $ pipenv --python 3.6.3 install
Creating a virtualenv for this project…
Using /home/ludwig125/.pyenv/versions/3.6.3/bin/python3.6m to create virtualenv…
⠋Running virtualenv with interpreter /home/ludwig125/.pyenv/versions/3.6.3/bin/python3.6m
Using base prefix '/home/ludwig125/.pyenv/versions/3.6.3'
New python executable in /home/ludwig125/.local/share/virtualenvs/python-getting-started-1TrsocCI/bin/python3.6m
Also creating executable in /home/ludwig125/.local/share/virtualenvs/python-getting-started-1TrsocCI/bin/python
Installing setuptools, pip, wheel...done.

Virtualenv location: /home/ludwig125/.local/share/virtualenvs/python-getting-started-1TrsocCI      Installing dependencies from Pipfile.lock (e19824)…
  �   ▉▉▉▉▉▉▉▉▉▉▉▉▉▉▉▉▉▉▉▉▉▉▉▉▉▉▉▉▉▉▉▉ 7/7 — 00:00:05
To activate this project's virtualenv, run the following:
 $ pipenv shell
[~/git/ludwig125/python-getting-started] $


[~/git/ludwig125/python-getting-started] $ pipenv check
Checking PEP 508 requirements…
Passed!
Checking installed package safety…
All good!
[~/git/ludwig125/python-getting-started] $
仮想環境を起動
[~/git/ludwig125/python-getting-started] $  pipenv shell
Loading .env environment variables…
Spawning environment shell (/bin/bash). Use 'exit' to leave.
source /home/ludwig125/.local/share/virtualenvs/python-getting-started-1TrsocCI/bin/activate
[~/git/ludwig125/python-getting-started] $ source /home/ludwig125/.local/share/virtualenvs/python-getting-started-1TrsocCI/bin/activate
(python-getting-started-1TrsocCI) [~/git/ludwig125/python-getting-started] $
Once dependencies are installed, you will be ready to run your app locally.
ここまでやれば、ローカル環境でアプリを実行する準備が整ったことになる
Run the app locally
https://devcenter.heroku.com/articles/getting-started-with-python#run-the-app-locally
The app is almost ready to start locally. Django uses local assets, so first, you’ll need to run collectstatic:
ここまででローカルで実行できる準備ができた。ここでcollectstaticを使う必要がある
python manage.py collectstatic
collectstatic とは http://django-staticfiles-doc-ja.readthedocs.io/en/latest/commands.html
collectstatic インストールしている全てのアプリケーションから静的ファイルを集めて STATICFILES_STORAGE にコピーします。
(python-getting-started-1TrsocCI) [~/git/ludwig125/python-getting-started] $ python manage.py collectstatic

yesを入力

(長いので省略)
Post-processed 'admin/css/responsive.css' as 'admin/css/responsive.25d98d3909ed.css'
Post-processed 'admin/css/dashboard.css' as 'admin/css/dashboard.7ac78187c567.css'

119 static files copied to '/home/ludwig125/git/ludwig125/python-getting-started/staticfiles', 145 post-processed.
(python-getting-started-1TrsocCI) [~/git/ludwig125/python-getting-started] $
ローカルサーバで実行
heroku local web でできる
(python-getting-started-1TrsocCI) [~/git/ludwig125/python-getting-started] $ heroku local web
[OKAY] Loaded ENV .env File as KEY=VALUE Format
23:48:35 web.1   |  [2017-12-22 23:48:35 +0900] [11733] [INFO] Starting gunicorn 19.7.1
23:48:36 web.1   |  [2017-12-22 23:48:35 +0900] [11733] [INFO] Listening at: http://0.0.0.0:5000 (11733)
23:48:36 web.1   |  [2017-12-22 23:48:35 +0900] [11733] [INFO] Using worker: sync
23:48:36 web.1   |  [2017-12-22 23:48:35 +0900] [11736] [INFO] Booting worker with pid: 11736
ブラウザで以下を見てみる
「Getting Started with Python on Heroku」の画面が表示された (https://github.com/heroku/python-getting-started/blob/master/hello/templates/index.html のページが表示されている)

(python-getting-started-1TrsocCI) [~/git/ludwig125/python-getting-started] $ heroku local web
[OKAY] Loaded ENV .env File as KEY=VALUE Format
23:48:35 web.1   |  [2017-12-22 23:48:35 +0900] [11733] [INFO] Starting gunicorn 19.7.1
23:48:36 web.1   |  [2017-12-22 23:48:35 +0900] [11733] [INFO] Listening at: http://0.0.0.0:5000 (11733)
23:48:36 web.1   |  [2017-12-22 23:48:35 +0900] [11733] [INFO] Using worker: sync
23:48:36 web.1   |  [2017-12-22 23:48:35 +0900] [11736] [INFO] Booting worker with pid: 11736
23:51:43 web.1   |  Not Found: /favicon.ico    ← ここが出力された
- 止めるときはCtrl+c
Push local changes
https://devcenter.heroku.com/articles/getting-started-with-python#push-local-changes
ローカルで変更した結果をherokuに反映させる方法を見る
$ pipenv install requests
requestsとは? http://pipenv-ja.readthedocs.io/ja/translate-ja/install.html
(python-getting-started-1TrsocCI) [~/git/ludwig125/python-getting-started] $ pipenv install requests
Installing requests…
Collecting requests
  Using cached requests-2.18.4-py2.py3-none-any.whl
Collecting chardet<3.1.0,>=3.0.2 (from requests)
  Using cached chardet-3.0.4-py2.py3-none-any.whl
Collecting urllib3<1.23,>=1.21.1 (from requests)
  Using cached urllib3-1.22-py2.py3-none-any.whl
Collecting certifi>=2017.4.17 (from requests)
  Using cached certifi-2017.11.5-py2.py3-none-any.whl
Collecting idna<2.7,>=2.5 (from requests)
  Using cached idna-2.6-py2.py3-none-any.whl
Installing collected packages: chardet, urllib3, certifi, idna, requests
Successfully installed certifi-2017.11.5 chardet-3.0.4 idna-2.6 requests-2.18.4 urllib3-1.22

Adding requests to Pipfile's [packages]…
  PS: You have excellent taste! ✨ � ✨
Locking [dev-packages] dependencies…
Locking [packages] dependencies…
Updated Pipfile.lock (c8a67b)!
(python-getting-started-1TrsocCI) [~/git/ludwig125/python-getting-started] $
Pipfileは以下が追加される
index 70ca30f..affd239 100644
=--- a/Pipfile
=+++ b/Pipfile
@@ -9,6 +9,7 @@ verify_ssl = true
 django = "*"
 gunicorn = "*"
 django-heroku = "*"
=+requests = "*"
以下のように修正する
(python-getting-started-1TrsocCI) [~/git/ludwig125/python-getting-started] $ cat hello/views.py
import requests   ← 追加
from django.shortcuts import render
from django.http import HttpResponse

from .models import Greeting

## Create your views here.
#def index(request):
#    # return HttpResponse('Hello from Python!')
#    return render(request, 'index.html')               ← ここをコメントアウトして、以下のindex関数を追加
def index(request):
    r = requests.get('http://httpbin.org/status/418')
    print(r.text)
    return HttpResponse('<pre>' + r.text + '</pre>')


def db(request):

    greeting = Greeting()
    greeting.save()

    greetings = Greeting.objects.all()

    return render(request, 'db.html', {'greetings': greetings})

(python-getting-started-1TrsocCI) [~/git/ludwig125/python-getting-started] $
修正が終わったらheroku local
(python-getting-started-1TrsocCI) [~/git/ludwig125/python-getting-started] $ heroku local
[OKAY] Loaded ENV .env File as KEY=VALUE Format
00:03:32 web.1   |  [2017-12-23 00:03:32 +0900] [12475] [INFO] Starting gunicorn 19.7.1
00:03:32 web.1   |  [2017-12-23 00:03:32 +0900] [12475] [INFO] Listening at: http://0.0.0.0:5000 (12475)
00:03:32 web.1   |  [2017-12-23 00:03:32 +0900] [12475] [INFO] Using worker: sync
00:03:32 web.1   |  [2017-12-23 00:03:32 +0900] [12478] [INFO] Booting worker with pid: 12478
この状態で再び http://localhost:5000/ へアクセス 可愛い絵が現れた(以下の絵)
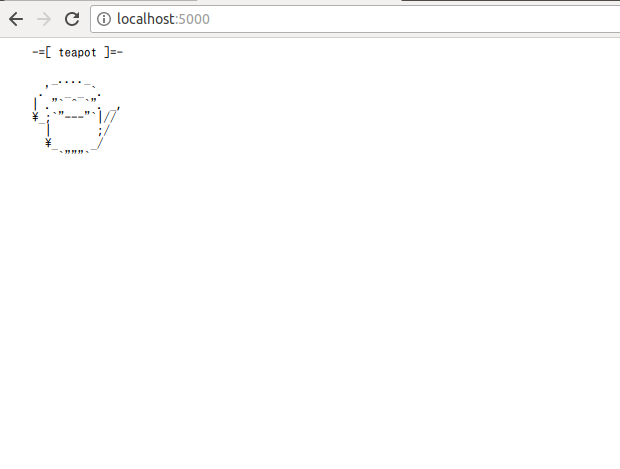
また、以下にも絵が出力された
(python-getting-started-1TrsocCI) [~/git/ludwig125/python-getting-started] $ heroku local
[OKAY] Loaded ENV .env File as KEY=VALUE Format
00:03:32 web.1   |  [2017-12-23 00:03:32 +0900] [12475] [INFO] Starting gunicorn 19.7.1
00:03:32 web.1   |  [2017-12-23 00:03:32 +0900] [12475] [INFO] Listening at: http://0.0.0.0:5000 (12475)
00:03:32 web.1   |  [2017-12-23 00:03:32 +0900] [12475] [INFO] Using worker: sync
00:03:32 web.1   |  [2017-12-23 00:03:32 +0900] [12478] [INFO] Booting worker with pid: 12478
00:04:52 web.1   |  [2017-12-23 00:04:52 +0900] [12475] [CRITICAL] WORKER TIMEOUT (pid:12478)
00:04:52 web.1   |  [2017-12-22 15:04:52 +0000] [12478] [INFO] Worker exiting (pid: 12478)
00:04:52 web.1   |      -=[ teapot ]=-
00:04:52 web.1   |         _...._
00:04:52 web.1   |       .'  _ _ `.
00:04:52 web.1   |      | ."` ^ `". _,
00:04:52 web.1   |      \_;`"---"`|//
00:04:52 web.1   |        |       ;/
00:04:52 web.1   |        \_     _/
00:04:52 web.1   |          `"""`
00:04:52 web.1   |  [2017-12-23 00:04:52 +0900] [12573] [INFO] Booting worker with pid: 12573
この画像は、当然先程直したindex関数の中で指定したURLの画像 http://httpbin.org/status/418
ここまでをリモートに反映
$ git add .
$ git commit -m "Demo"

herokuサーバにデプロイ
$ git push heroku master
全部うまく行っていることを確認する
$ heroku open
https://powerful-chamber-29168.herokuapp.com/ のブラウザが起動してさっきの画像が表示される
Start a console
https://devcenter.heroku.com/articles/getting-started-with-python#start-a-console
コンソールを起動する
さっきの画像がpythonのREPLで見られるよって話
(python-getting-started-1TrsocCI) [~/git/ludwig125/python-getting-started] $ heroku run python manage.py shell
Running python manage.py shell on ⬢ powerful-chamber-29168... up, run.8841 (Free)
Python 3.6.3 (default, Nov 14 2017, 17:29:48)
[GCC 5.4.0 20160609] on linux
Type "help", "copyright", "credits" or "license" for more information.
(InteractiveConsole)
>>> import requests
>>> print(requests.get('http://httpbin.org/status/418').text)

    -=[ teapot ]=-

       _...._
     .'  _ _ `.
    | ."` ^ `". _,
    \_;`"---"`|//
      |       ;/
      \_     _/
        `"""`

>>>
>>> exit()
(python-getting-started-1TrsocCI) [~/git/ludwig125/python-getting-started] $
bashも起動できる
(python-getting-started-1TrsocCI) [~/git/ludwig125/python-getting-started] $ heroku run bash
Running bash on ⬢ powerful-chamber-29168... up, run.2947 (Free)
~ $ ls
app.json        hello      Pipfile       Procfile          README.md         runtime.txt
gettingstarted  manage.py  Pipfile.lock  Procfile.windows  requirements.txt  staticfiles
~ $ echo "test"
test
~ $
~ $ exit
exit
(python-getting-started-1TrsocCI) [~/git/ludwig125/python-getting-started] $
Define config vars
https://devcenter.heroku.com/articles/getting-started-with-python#define-config-vars
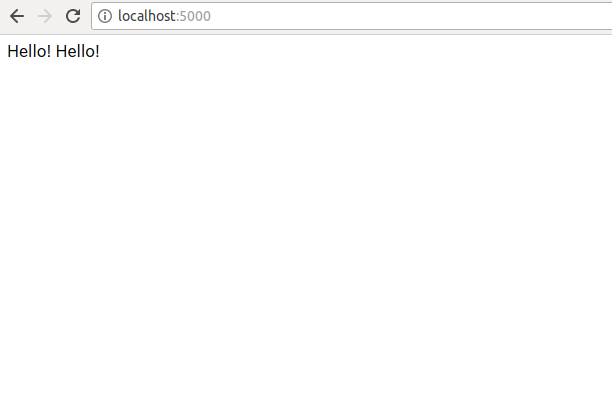
環境変数を定義 先程のhello/view.pyを以下のように書き換え
import os  ← 追加

def index(request):    ← このように書き換え
    times = int(os.environ.get('TIMES',3))
    return HttpResponse('Hello! ' * times)
os.environ.get は環境変数を読み込んでなければデフォルト値(上の例だと3)を使うという意味(pythonの文法)
チュートリアルの場合、.envは以下に定義されているので、TIMES=2が適用されるはず
(python-getting-started-1TrsocCI) [~/git/ludwig125/python-getting-started] $ cat .env
TIMES=2
(python-getting-started-1TrsocCI) [~/git/ludwig125/python-getting-started] $
$ heroku local で実行
ブラウザには「Hello! Hello!」とHello!が2個実行された
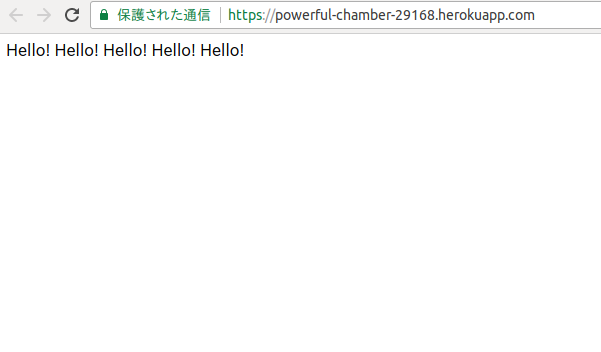
この環境変数を変えるには以下のコマンドをする
$ heroku config:set TIMES=5
実行すると、変数が変わっていることが確認できる
(python-getting-started-1TrsocCI) [~/git/ludwig125/python-getting-started] $ heroku config
=== powerful-chamber-29168 Config Vars
DATABASE_URL: postgres://ogrzfymdqwvqaz:49b120efdf13380c9dfeba77a533744212084d29e5b3b18d5389e8015711b85a@ec2-184-73-240-228.compute-1.amazonaws.com:5432/dbejvvccb8644e
TIMES:        5
(python-getting-started-1TrsocCI) [~/git/ludwig125/python-getting-started] $
これを以下の通りデプロイしてブラウザで見るとHello!は5つになる
$ git push heroku master
$ heroku open
https://powerful-chamber-29168.herokuapp.com/ → Hello! Hello! Hello! Hello! Hello!
herokuについて参考にしたページ
https://qiita.com/Arashi/items/b2f2e01259238235e187
http://kasoutuuka.org/heroku-hello